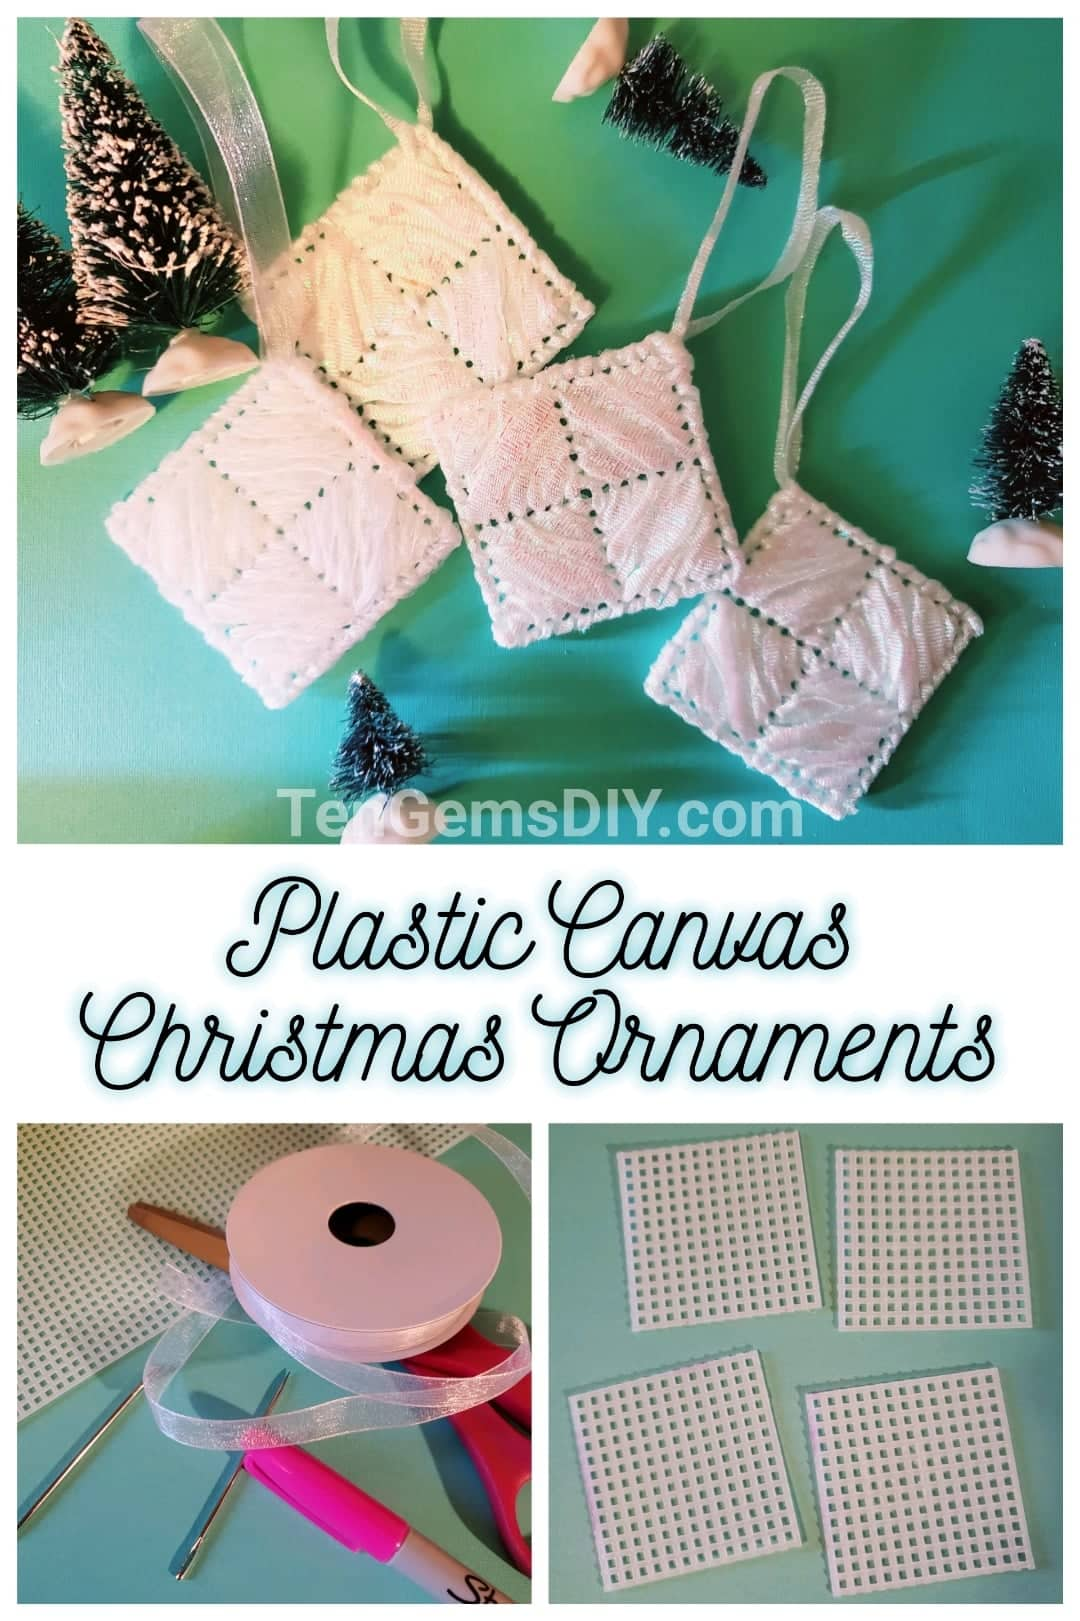
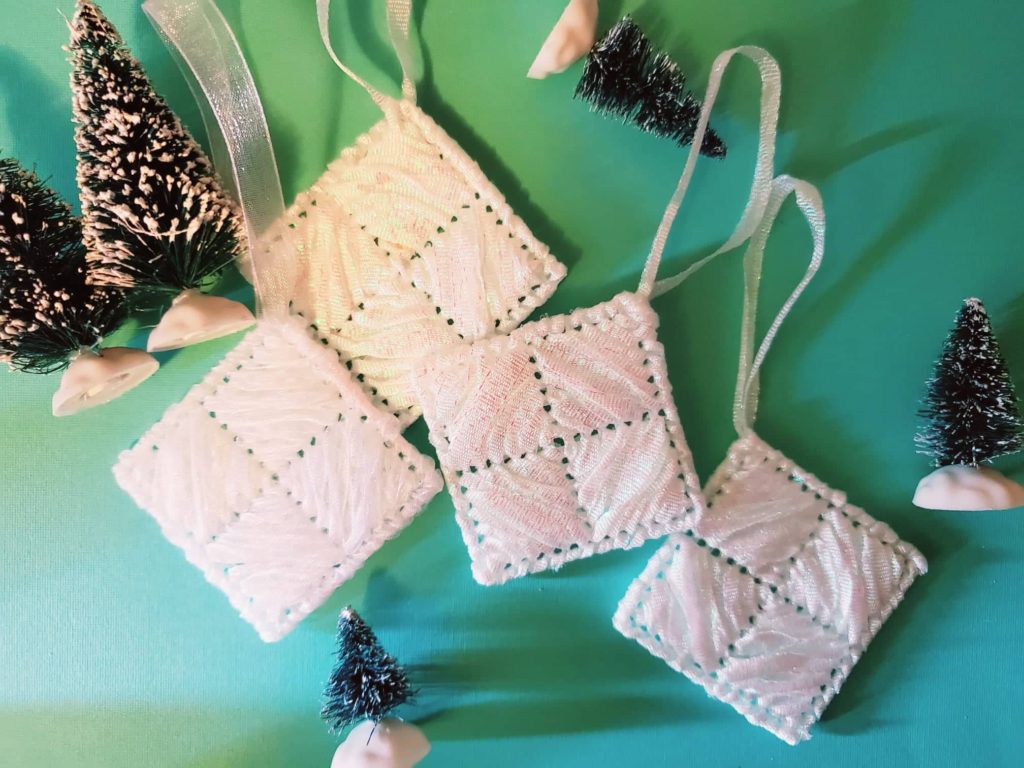
These unique shimmering Easy DIY plastic canvas Christmas ornaments are unique and super fun to make. Some of the ornaments at the store are just so bland and generic. The holidays feel a little more special when some things are hand made. Why not start with a few ornaments? Easy DIY plastic canvas Christmas ornaments are a great project because they look great and they can be given as one of a kind gifts. It’s hard to only make one or two. You’ll be obsessed with how easy they are to make.
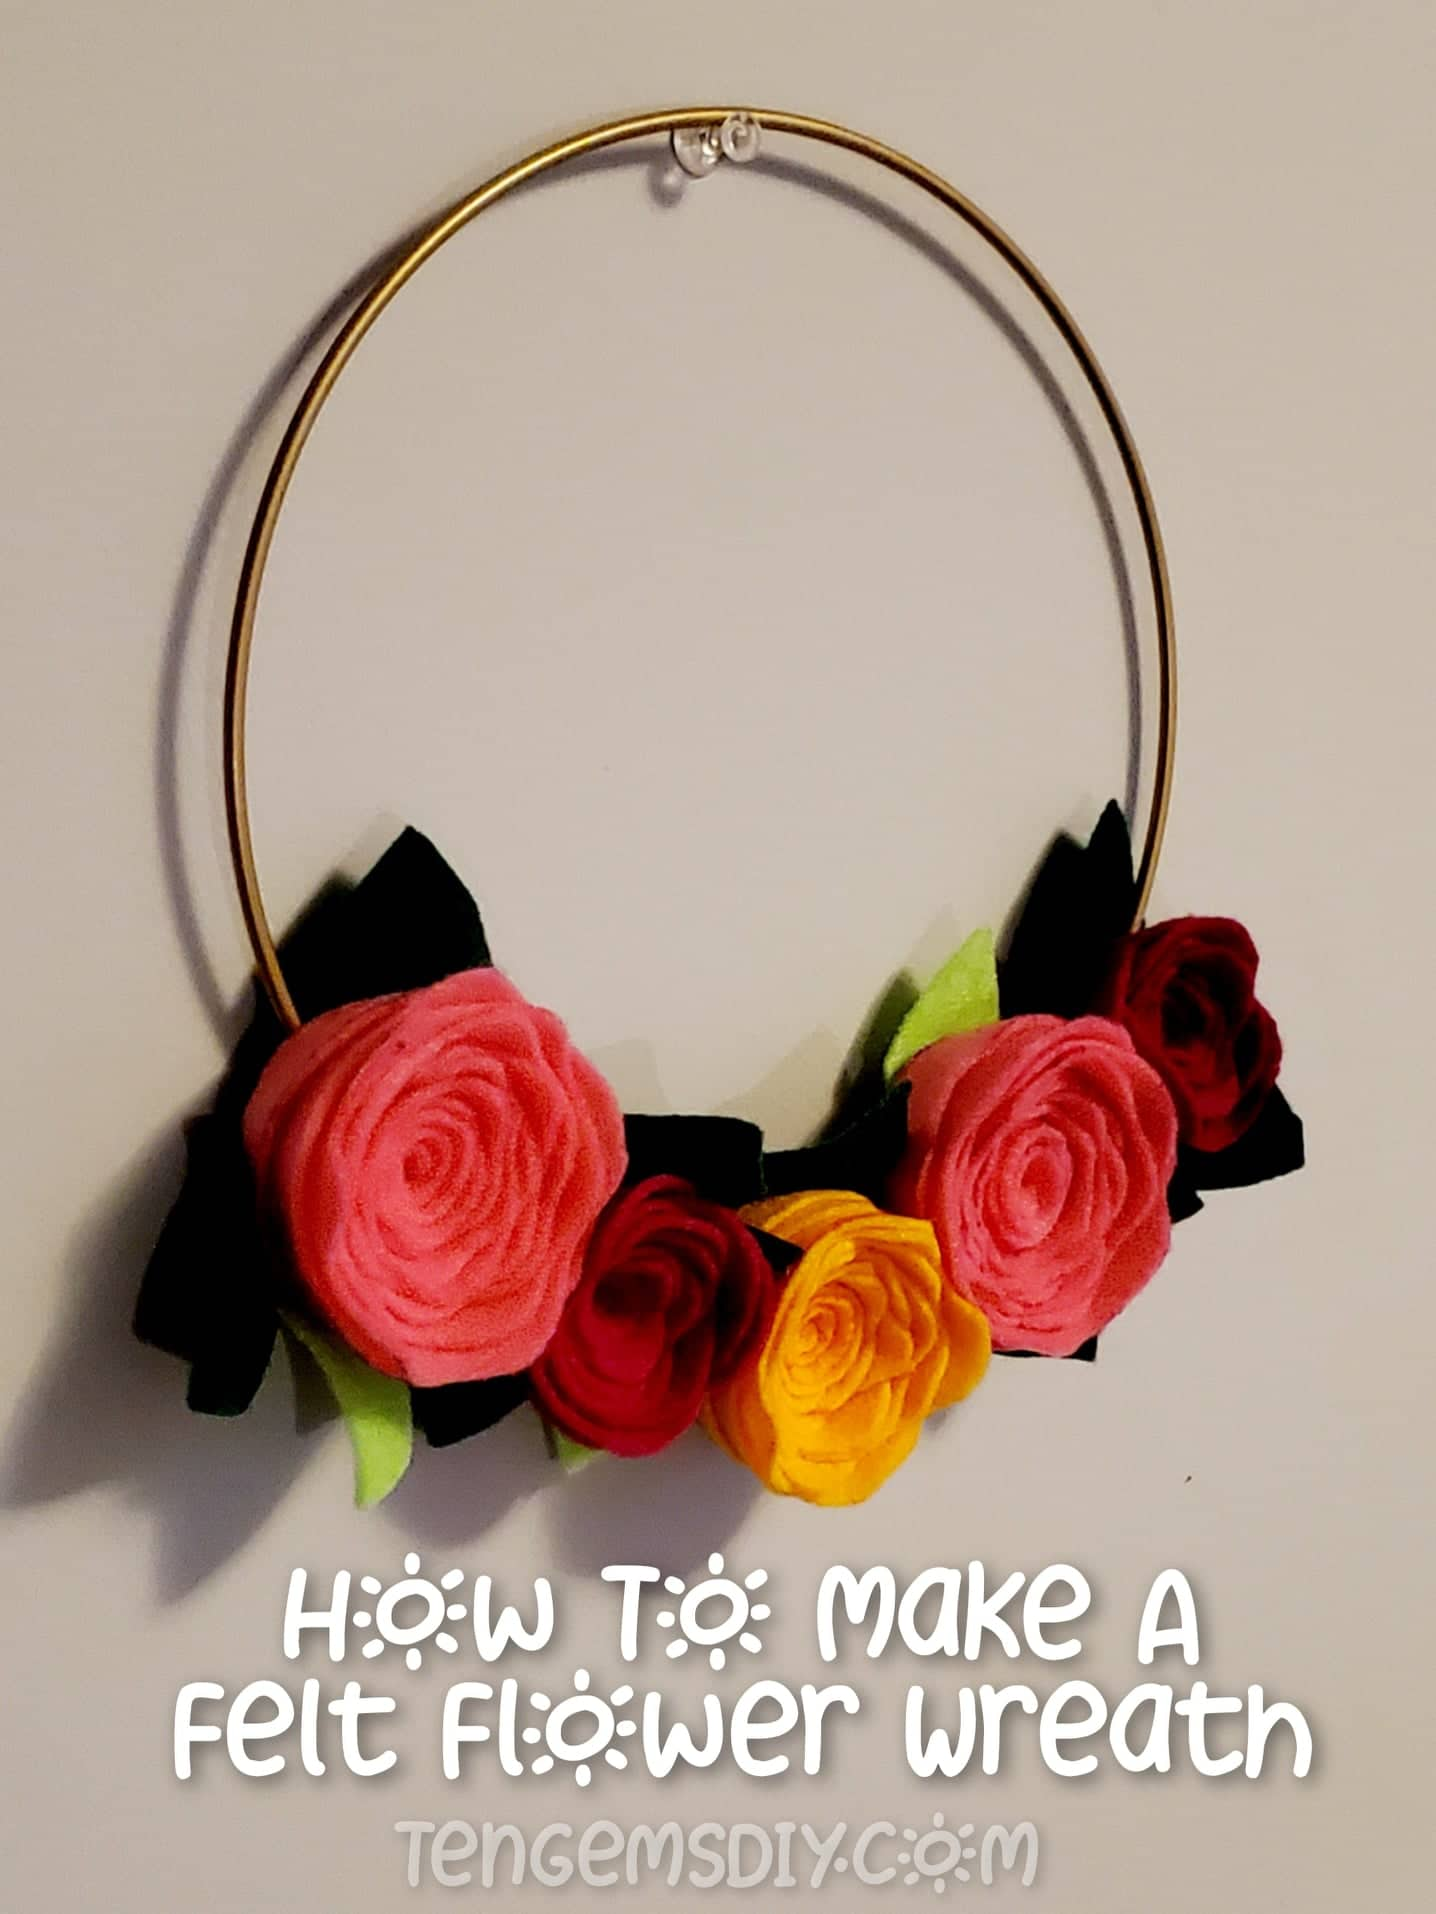
If you’re looking for other unique and gorgeous ideas for handmade ornaments, check out this tutorial for How To Make Easy DIY Paper Christmas Ornaments – https://tengemsdiy.com/how-to-make-easy-diy-paper-christmas-ornaments/
Or find out how to make these easy 3D Paper Christmas Ornaments! – https://tengemsdiy.com/how-to-make-easy-3d-paper-christmas-ornaments/
TenGemsDIY is a DIY and craft blog. Some of our posts contain affiliate links for products we have tried and recommend. While clicking the links will not cost any money, we may receive a commission for items purchased, which helps keep our website up and running. Here is the privacy policy for more information: https://tengemsdiy.com/?page_id=3
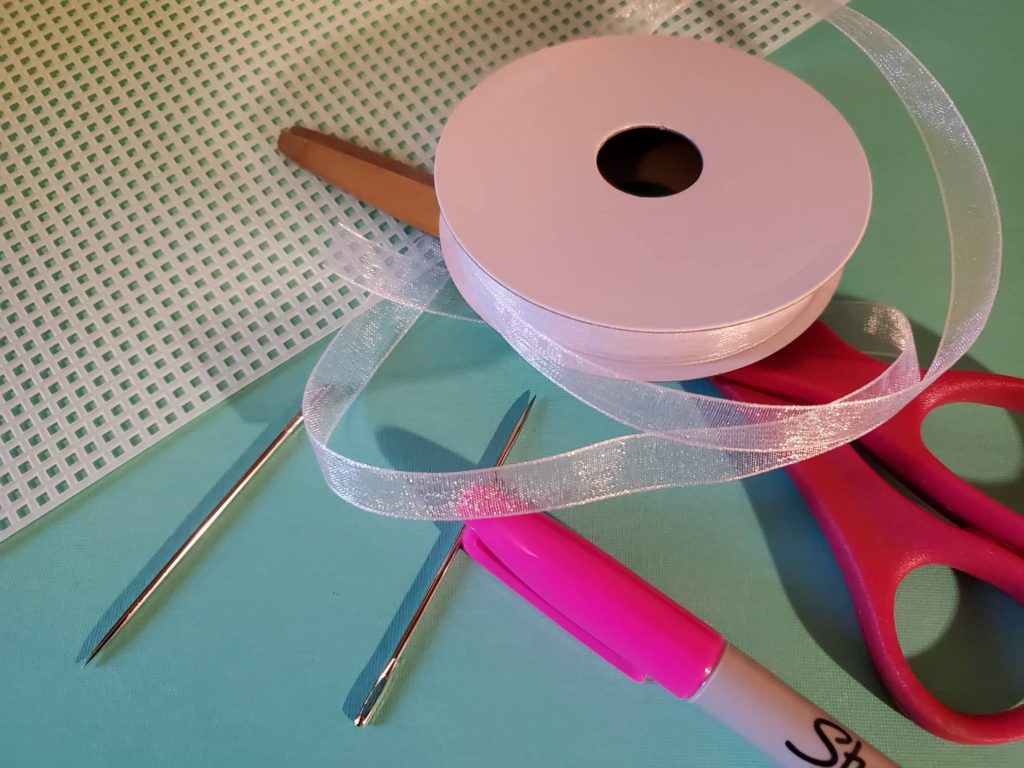
Supplies you’ll need for your Easy DIY Plastic Canvas Christmas Ornaments and where to find them:
- Plastic canvas sheets – https://amzn.to/3dgzn5Z
- Yarn needles – https://amzn.to/3y65OxP
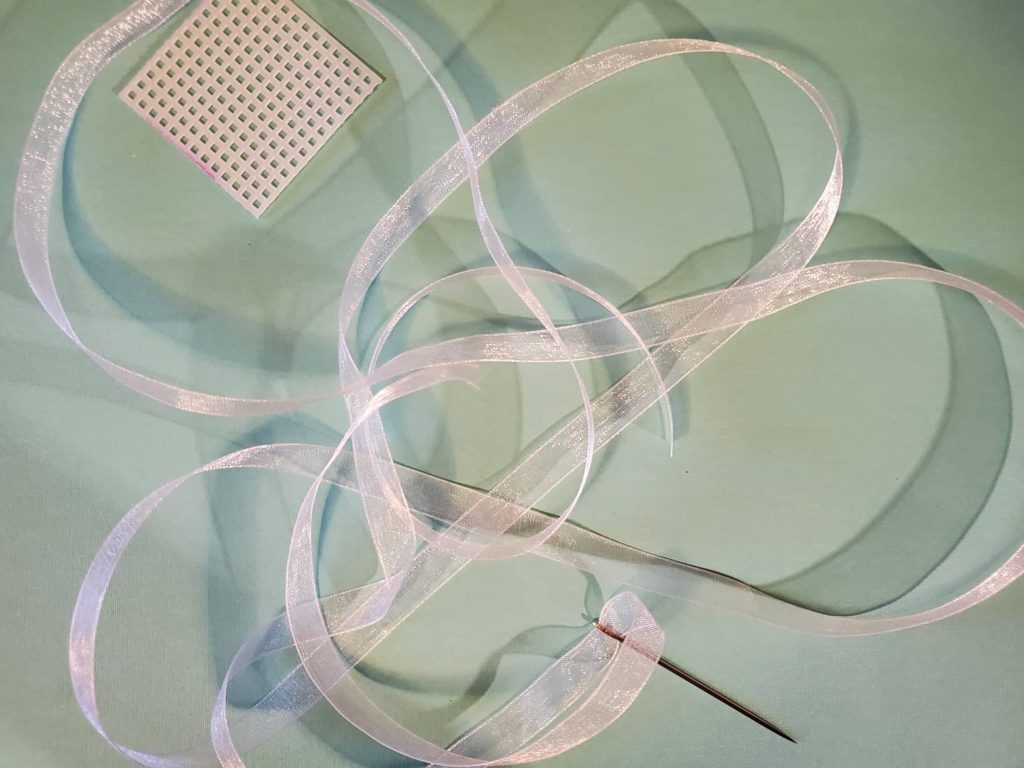
- Sheer ribbon – not full thickness ribbon – I used 1/2″ – https://amzn.to/3lwwv9u
- Scissors – https://amzn.to/2Z3UdBL
- Permanent marker
Step one: How much plastic canvas to cut
These ornaments are 13 x 13 holes. Cut out a few squares and when you’re ready to make more, you can always come back to cut more plastic canvas.
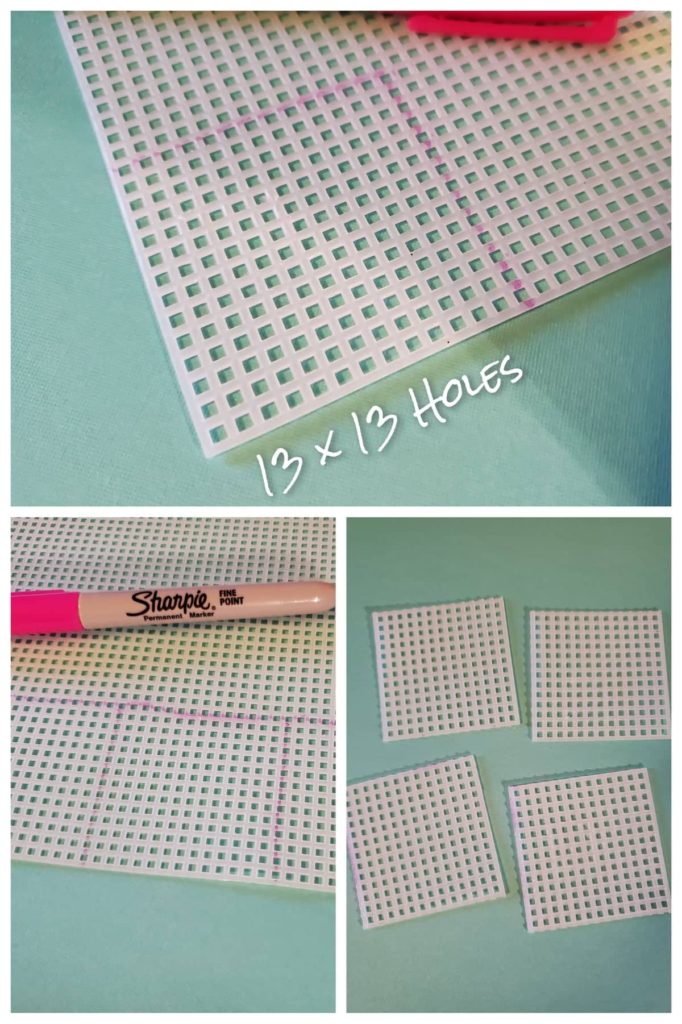
I like to make a mark for where to cut so I’m not just trying to eyeball it. I marked four squares to start. Cut all your squares out. You can see the edge you just cut is jagged and rough. Use your scissors to cut the pegs off of the side, as closely to the edge as you can. It doesn’t have to be perfect as it will be covered up by your ribbon later anyways.

Step two: Threading your needle
It’s important to use yarn needles here, as regular sewing needles won’t be big enough to thread your ribbon through. For one ornament, you’ll want about four yards of ribbon.
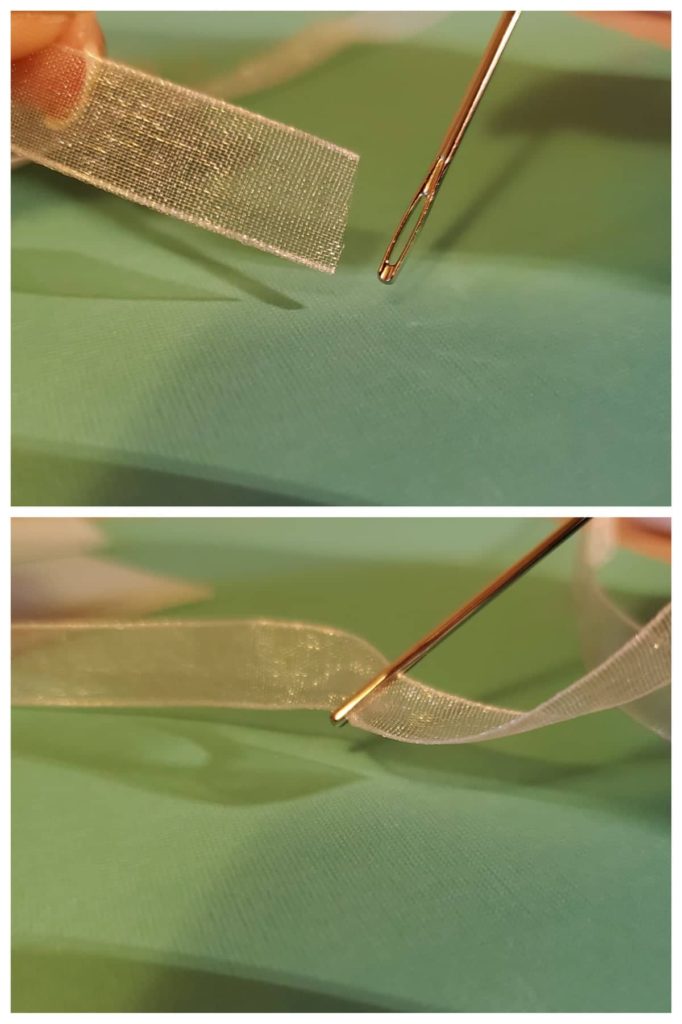
Another important thing to note here is that you cannot easily use regular, full thickness ribbon for this project. Regular ribbon is too thick to thread through the plastic canvas and is an absolute pain. I promise – I’ve tried it.
You can fold your ribbon in half to help thread it through the eye of the yarn needle.
Step three: Weaving your shimmering ribbon for your Easy DIY Plastic Canvas Christmas Ornaments
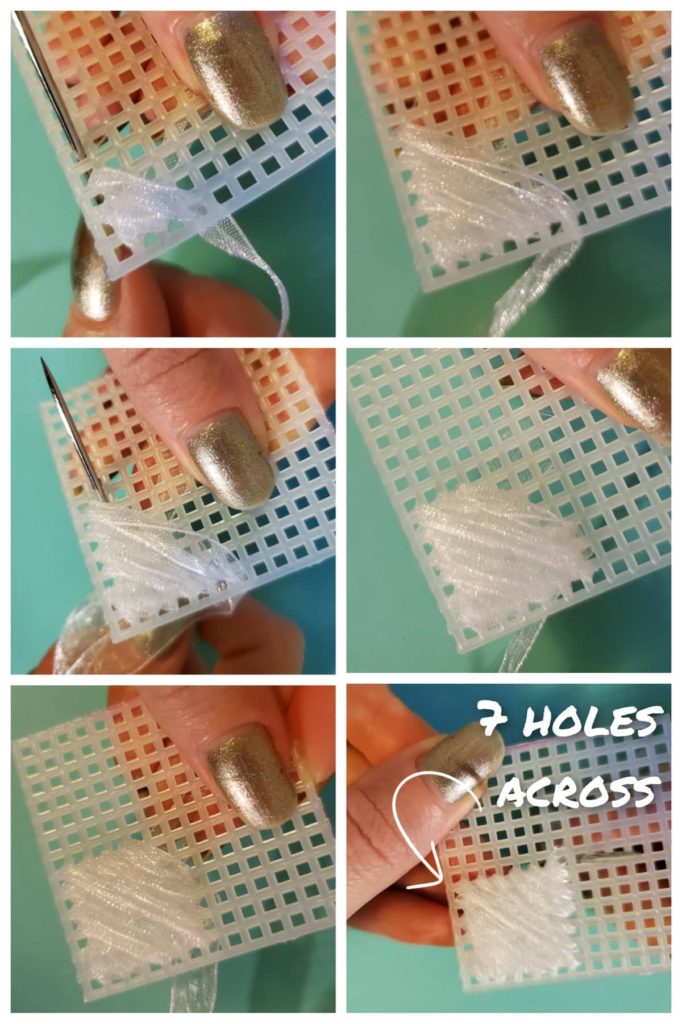
To start weaving your beautiful plastic canvas christmas ornaments, you’ll bring the needle through the second from the last hole, as shown in the picture here. Leave a little tail about an inch long on the back of the ornament and hold it down with your finger. There is no need to tie a knot.

Bring your needle point diagonally to the second hole up from the corner, as shown in the photo here, and pull your ribbon all the way through.
Thread your needle from the back, going over the tail of ribbon you’re still holding, through to the front from the third hole from the corner. Then weave diagonally to the third hole up from the corner.
Weave around to the back, over your ribbon tail, to the fourth hole, then diagonally again to the fourth hole up from the corner. Weave six diagonal lines, then start decreasing your number of holes again to complete a square. One square will be 7 x 7 holes.
Step four: Making progress
The first plastic canvas ornament is about learning. Be patient with it.
After you have completed one square of woven ribbon, start another square by skipping a hole and creating more diagonal lines going the opposite direction. The edges of the squares will share holes, so some holes will be used twice.

After you’ve finished half of the ornament, your ribbon will be on the outside corner of your plastic canvas square. Simply slide your yarn needle underneath your woven ribbon on the back side. Try to avoid getting your needle through the woven ribbon. Pull your needle through and start weaving again from the far corner while weaving over your stray ribbon you just created on the back of the ornament to hide it completely.
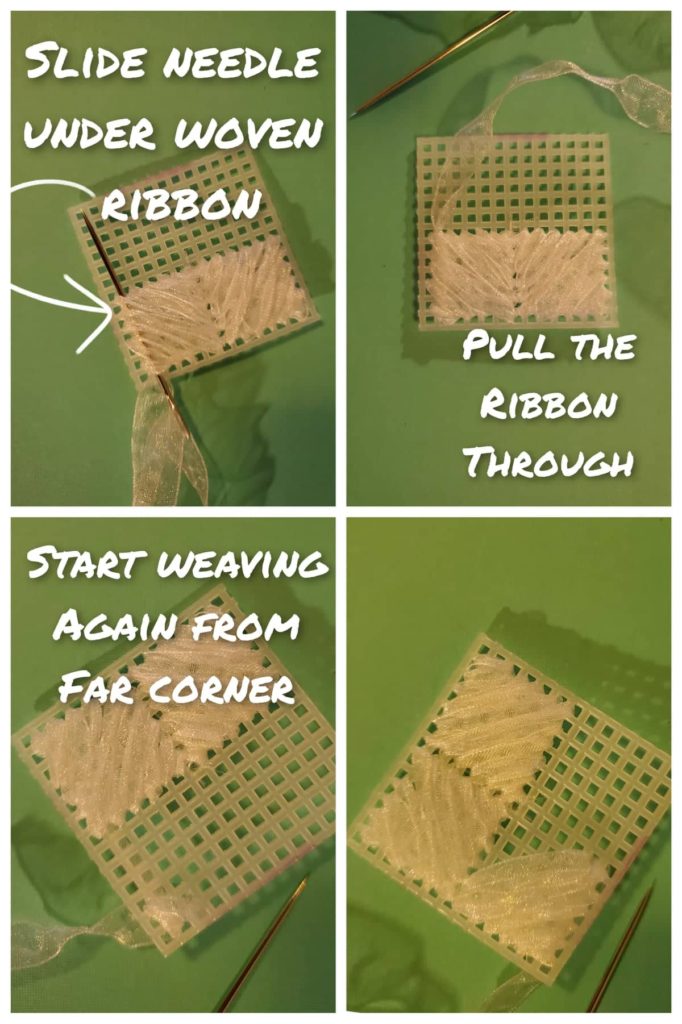
It’s lookin’ beautiful and you should just have one more square to go.
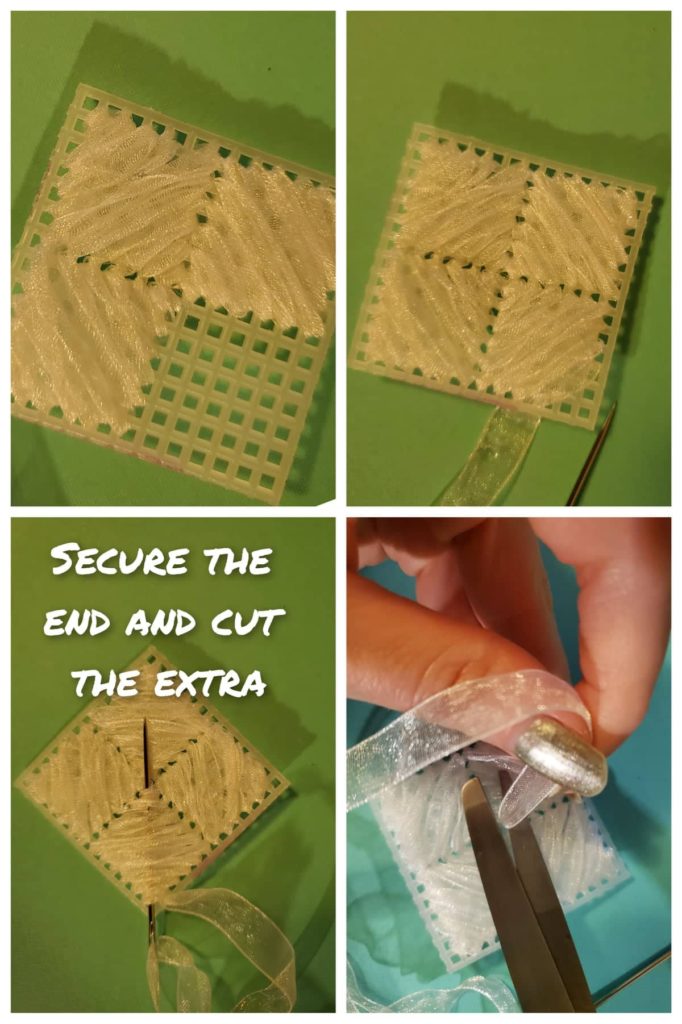
After you’re finished weaving your four diagonal squares, we’ll secure the ribbon. Carefully slide the yarn needle underneath your woven ribbon again on the back side, pull the ribbon through and cut it close so you don’t have any loose ribbon on the back.
Step five: Finishing up
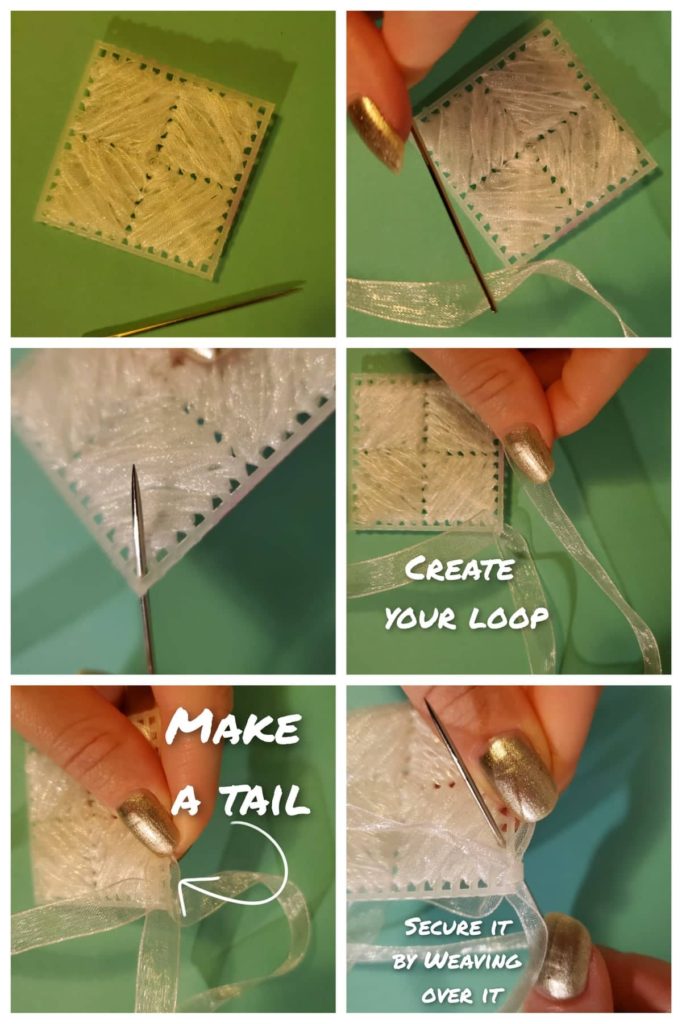
This is where we’ll make the border and the loop to hang your gorgeous Easy DIY Plastic Canvas Christmas Ornament. Create a loop about as long as you’d like your hanger to be. Leave about an inch long tail again. We’ll secure this by weaving over it, just like before. Leave your hanging string loose and hold the tail while your wrap your ribbon and needle around to each hole, creating your border and finishing up your plastic canvas Christmas ornaments.
Once you’re done with the border, tuck your ribbon in underneath your woven ribbon on the back one more time like we’ve done previously by bringing the needle under your woven ribbon, pulling it through and cutting it short.
Look at those amazing Easy DIY Plastic Canvas Christmas Ornaments you made! Now you gotta make more! They’ll look great as gifts or even better on your tree!
We are a participant in the Amazon Services LLC Associates Program, and affiliate advertising program designed to provide a means for us to earn fees by linking to Amazon.com and affiliated sites.